
In Zoom, July 24 3-6 pm ETZ
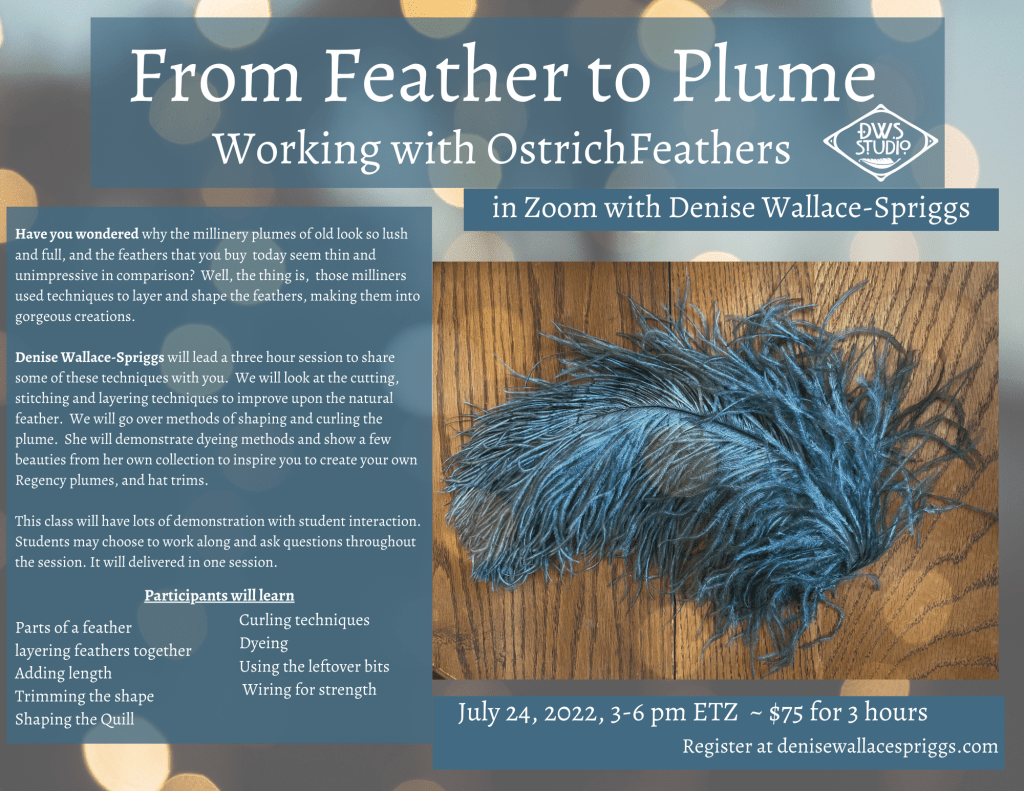
Have you wondered why the millinery plumes of old look so lush and full, and the feathers that you buy today seem thin and unimpressive in comparison? Well, the thing is, those milliners used techniques to layer and shape the feathers, making them into gorgeous creations.
Denise Wallace-Spriggs will lead a three-hour session to share some of these techniques with you. We will look at the cutting, stitching, and layering techniques to improve upon the natural feather. We will go over methods of shaping and curling the plume. She will demonstrate dyeing methods and show a few beauties from her own collection to inspire you to create your own Regency plumes, and hat trims.
This class will have lots of demonstration, with student interaction. Students may choose to work along and ask questions throughout the session. It will be delivered in one session.
I am in Boston, MA USA. To find your local time: https://www.worldtimebuddy.com/
Outline
Parts of a feather
layering feathers together
Adding length
Trimming the shape
Sources for supplies
Shaping the quill
Curling techniques
Dyeing
Using the leftover bits
Wiring for strength

Feathers: Special Offer for Costume On Wait list
This offer is for the same special pricing as offered for The Costume On Conference, which is $25 less than the current pricing. Class will be delivered on July 24, from 3-6 pm ETZ, in Zoom
$50.00
Supply list if you choose to work along during class
Ostrich Feathers: at least 2 of any length that you choose
Millinery Wire: I suggest a light gauge such as #20 or #21 covered. You can also use fine, covered florist wire
Thread: standard sewing thread
StrongThread: such as topstitching thread, CottonQuiltingThread, Silktopstitchthread, or#69BondedNylon. Needles: Suggested are #7, or #8, milliners, any long thin flexible needle that you feel comfortable with will do. Sewing Pins: I like the type with a ball head
Wonder Clips: not required, but mighty useful
Curling tool: You could use the dull side of a small knife, dull scissors, or any thin flat metal tool such as a pallet knife Cardboard: it could be mat board, chip board, even a cereal box. I like two pieces that are about 5-6″ x 10-14″
depending on the size of your feathers
Steam iron Press cloth
masking tape: or another tape to tape the cardboard
Not strictly needed, but nice to have:
Curling iron: various barrel sizes will work
Millinery Head Form: This could be a canvas wig block, a wooden head form or a simple styrofoam head form.
It will be used to balance your plume.
Mat Knife or Exacto Knife
Also:Pencil, eraser, tape measure, clear 2” ruler , craft scissors
Some Suppliers:
https://fancyfeather.com/ https://www.plumesnfeathers.com/
https://www.etsy.com/shop/MotherPluckerFeather?section_id=26469656
https://www.facebook.com/pattisplumes
https://www.eskayfeathers.com/category_s/281.htm
An online search will bring up suppliers in your area. If you have questions, please reach out to me.
DWS Studio reserves the right to cancel this class at any time, for any reason. If the class is canceled you will receive a full refund. Registrants may withdraw from the class up to 72 hours before the scheduled, for a refund. This allows DWS time to fill the empty seat.
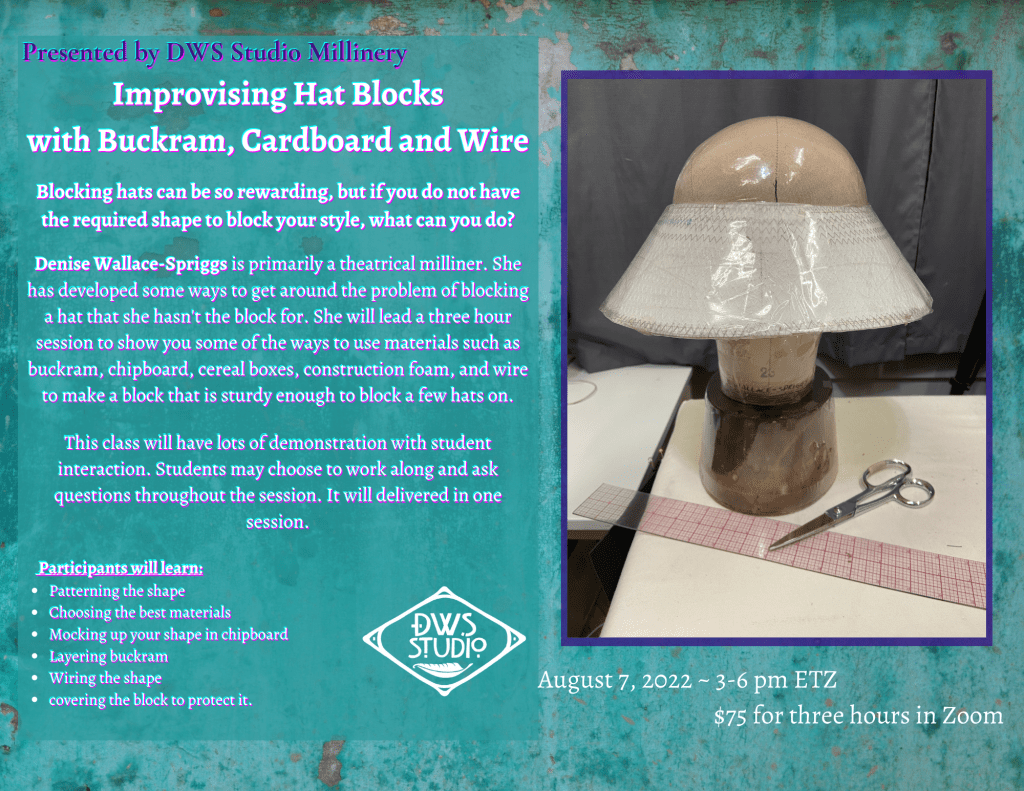
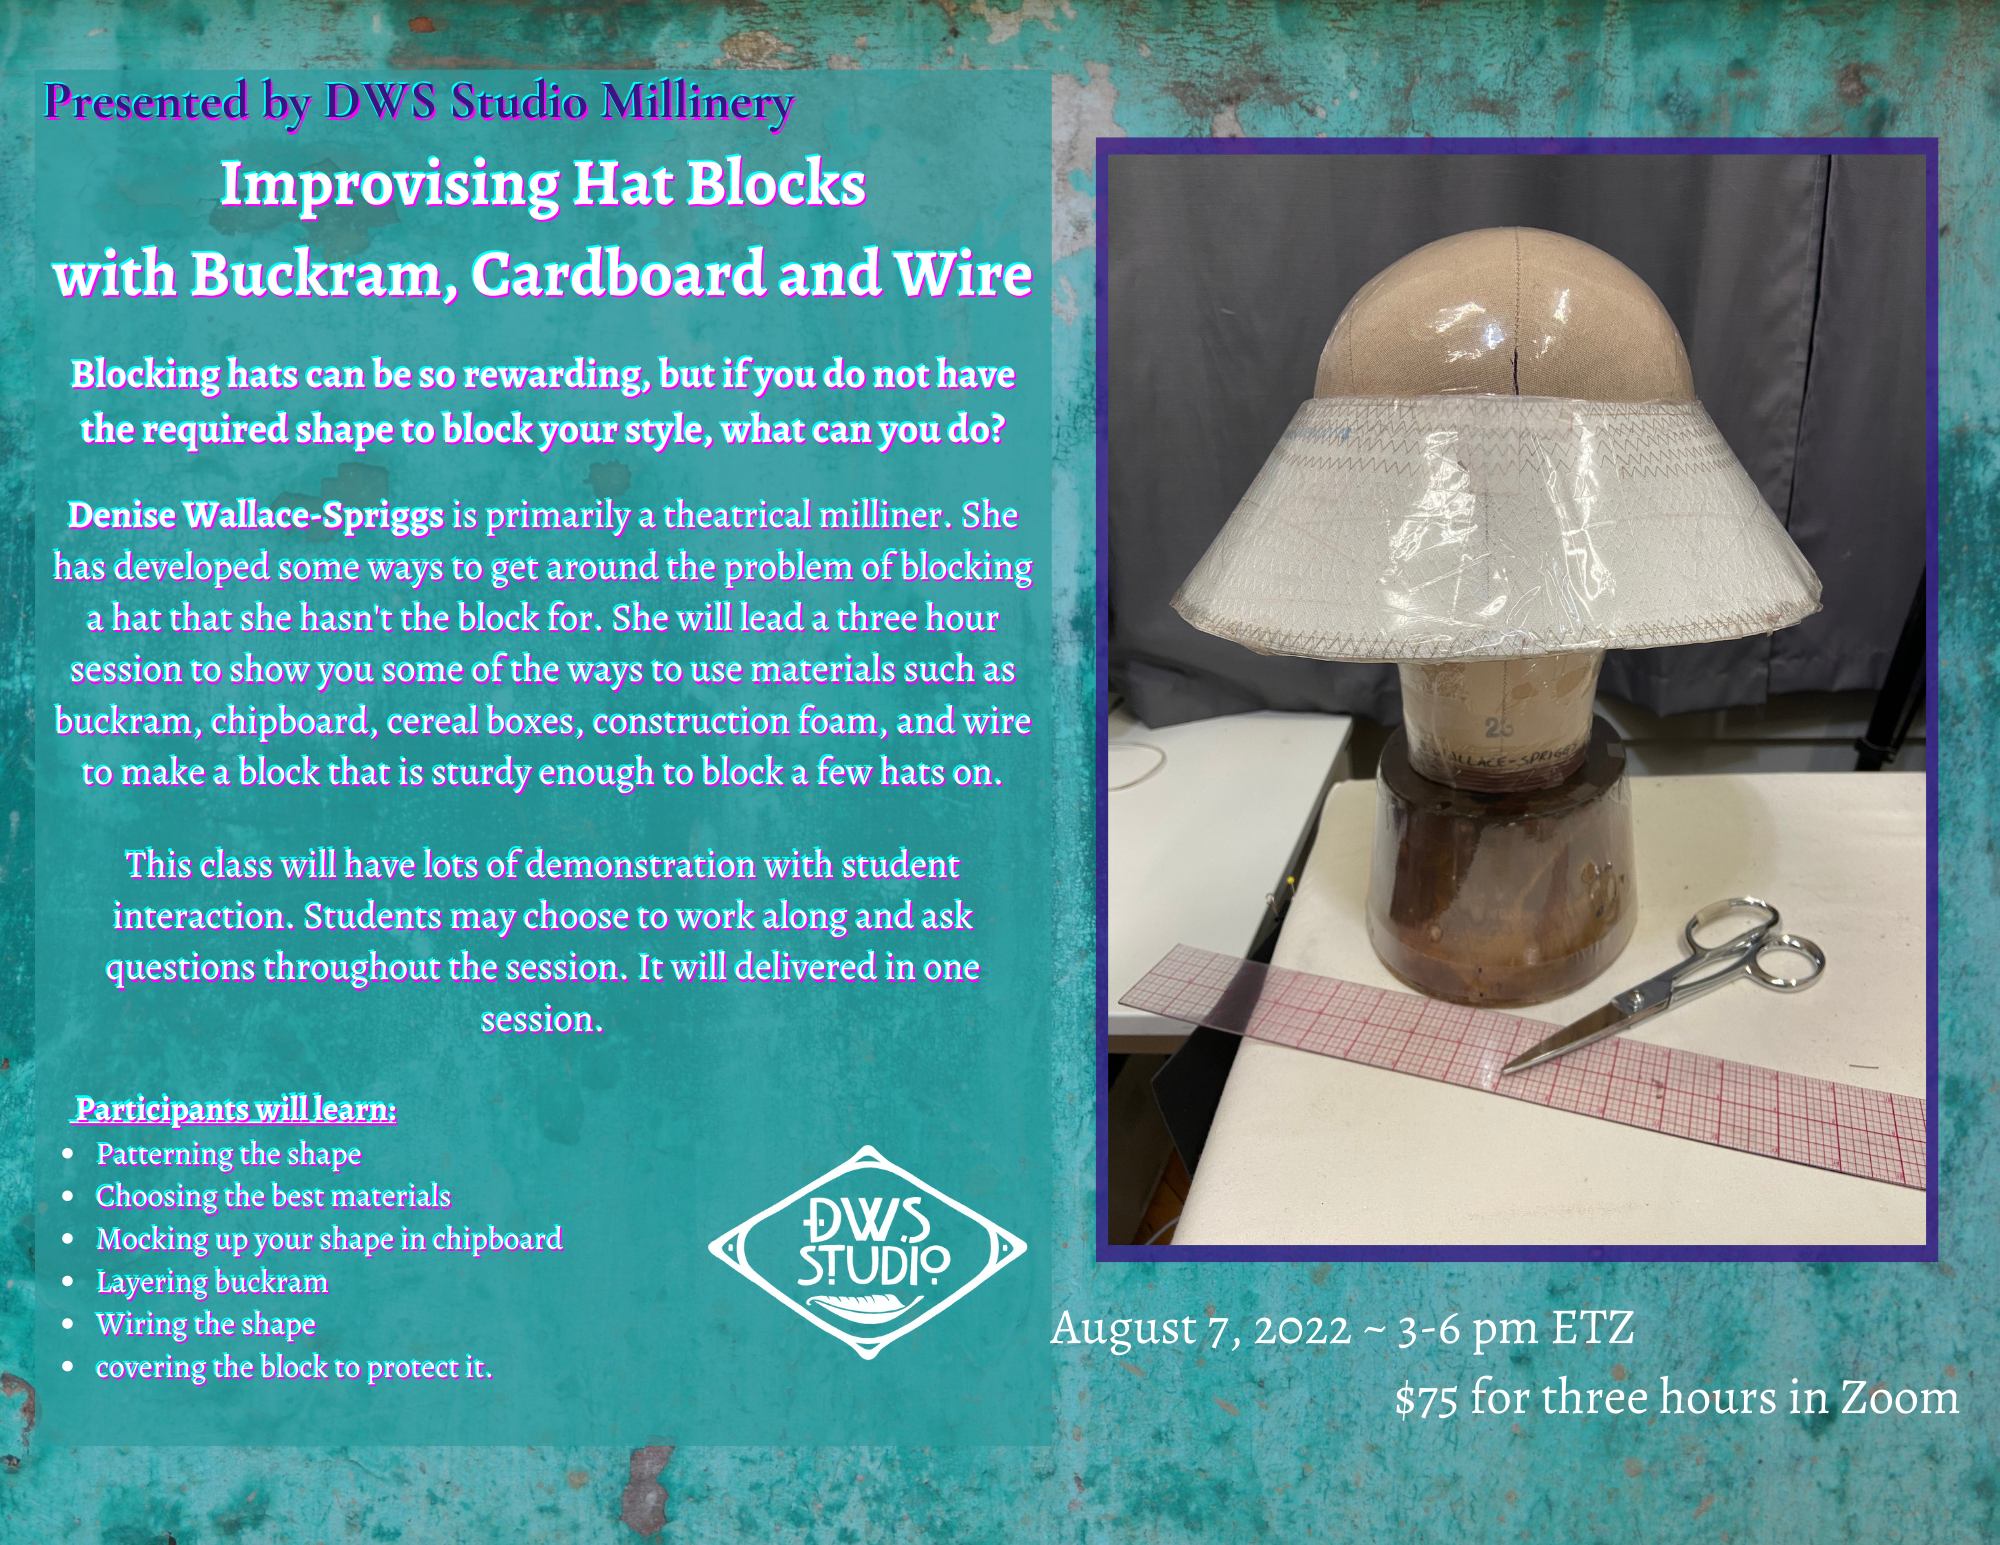
Denise Wallace-Spriggs is primarily a theatrical milliner. She has developed some ways to get around the problem of blocking a hat that she hasn’t the block for. She will lead a three-hour session to show you some of the ways to use materials such as buckram, chipboard, cereal boxes, construction foam, and wire to make a block that is sturdy enough to block a few hats on.
This class will have lots of demonstration, with student interaction. Students may choose to work along and ask questions throughout the session. It will be delivered in one session.
I am in Boston, MA USA. To Find your local time : https://www.worldtimebuddy.com/
Participants will learn:
Patterning the shape
Choosing the best materials, and where to find them
Mocking up your shape in chipboard
Layering buckram
Wiring the shape
Making the shape sturdy
Covering the block to protect it.
Blocks, Special Offer Costume On Waitlist
This offer is for the same special pricing as offered for The Costume On Conference, which is $25 less than the current pricing.
$50.00
Supply list if you choose to work along during class
Cardboard and/or Buckram : the amount will depend upon the size of your pattern.
Strong Millinery Wire: 18 gauge is good. 19 can be good if doubled. 16 can also be used, but is harder to bend Thread: standard sewing thread
Strong Thread: such as topstitching thread, Cotton Quilting Thread, Silk topstitch thread, or #69 Bonded Nylon. Needles: Suggested are #7, or #8, milliners, any long thin flexible needle that you feel comfortable with will do. Pins: I like the type with a ball head, or T-pins, or push-pins
Wonder Clips: not required, but mighty useful
Curling Tool: You could use the dull side of a small knife, dull scissors,
or any thin flat metal tool such as a pallet knife
Cardboard: it could be mat board, chip board, even a cereal box. I like two pieces that are about 5-6″ x 10-14″
depending on the size of your feathers
Tape: Scotch and a strong tape, I like packing tape. Gaffer’s tape or duct tape can be nice. masking tape tends to curl with steam
Steam iron Press cloth
Sewing machine
If using buckram Craft Scissors
Wire Cutters
Not strictly needed, but nice to have:
Millinery Head Form: This could be a canvas wig block, a wooden head form or a simple styrofoam head form. It will be used to balance your pattern
Mat Knife or Exacto Knife
Also:Pencil, eraser, tape measure, clear 2” ruler
